

You were in the kitchen on the weekends, looking at the space on the windowsill. Did you ever think about something? No dirt, no space, the kind that can come to the table in a few days. Yeah, it's sprouts. But online tutorials are either too professional or too vague to look at people. Take it easy, today we'll tear it apart so you can see which beans to start with。
From one bean to one dish, your kitchen schedule
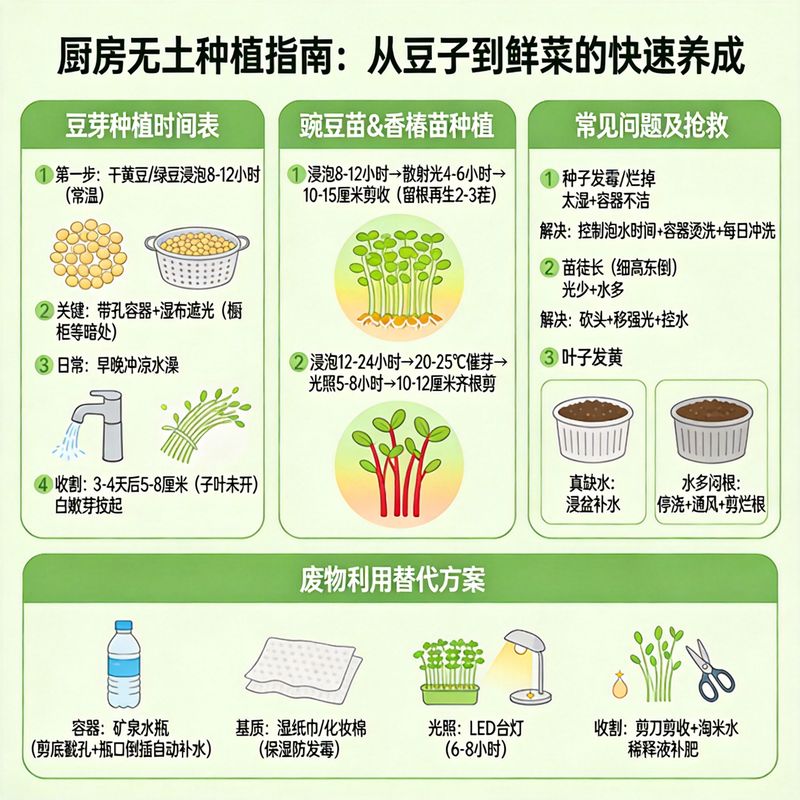
Imagine you bought a bag of dry beans or green beans from the supermarket. The first step is not just to sow soil, but to allow it to spend one night in water, about 8 to 12 hours. Water temperature is the constant temperature of your hands. The next morning, when you pull it out, you find the beans swelling, and that's the signal of sucking water。
Next is the key: finding a holed container, such as a washing basket, or poking holes in the bottom of a mineral water bottle. Put the bubbling beans in, put wet cloths or wet paper towels in the corner of your house, like in the cupboard. Remember, you can't see light all your life, and it turns green and old and tastes bad。
And then the only "farming job you have to do every day is to take a cold shower and keep it wet. In about three or four days, you lift the wet cloth and you can see that the white bean bud has grown. When it reaches 5 to 8 centimetres and leaves are not opened, it is the best harvest time, when the whole body is pulled up and the water is washed up. The whole process, you don't need any soil or fertilizer。
If you want more flavor, try pea seedlings and fragrance
The bean sprouts are too basic? The pea seedlings and the fragrance seedlings give you more fun to grow and change the table. The biggest difference between them and bean buds is that bean buds are afraid of light throughout, and they need light when they grow。
The seedlings of peas start from a similar start to the soybean sprouts, impregnating 8-12 hours later. But when the bud comes out, you have to move it to a place where there's light, like a bright window table, and you're tanning for four to six hours a day. You'll watch it slowly turn from yellow to green. When the sap grows to 10 to 15 centimeters, you can cut it off two or three centimeters from the root。
It's amazing that, with its roots, it'll last two or three more harvests。
It's more refined. Its seeds need to be soaked longer, 12 to 24 hours. The suitable temperature of the bud is 20-25°c. It also needs more light than peas, preferably five to eight hours a day. You can imagine it as a “honorant” in need of careful care, but the return is unique。
Slims are cut down at heights of 10 to 12 centimetres, or they are regenerated by retaining the base blades。
The trouble you might get, the rescue guide
When you grow, the worst thing to fear is the beginning of the rush, and it's broken in two days. Don't panic. Most of the problems are in detail。
Did you find the seeds rotten? It's usually too wet or the containers are dirty. Seeds can't bubble too long, the bottom of the container must never accumulate when sprouts, and the daily wash is a gas-off. Before seeding, the container is burned with open water, which can significantly reduce the disease。
Slim's tall and thin. Like sprouts? It's the master. The reason is simple: not enough light, too much water. It's trying hard to get light. The solution is to "head off" — cut off the long top of the table and move it to a place where the light is more adequate, and control watering, so that the matrix becomes dry. After cutting the top, the sprouts will come out more。
Leaves are yellow? Not yet. If it's light, the soil is dry, it's water-deficit, and it's watered slowly from the bottom. However, if the container is heavy and the soil is always wet and the leaves yellow, it is likely that the water is too suffocated to stop watering, to improve ventilation and, in serious cases, even to remove seedlings and cut the rotten roots again。
If you don't spend a penny, you can start with the shit on your hands
Seeing it here, you probably think you're gonna have to buy a nursery and a light. Not at all. The core of family cultivation is “substitution”。
Packaging: a 500 ml mineral water bottle is the best option. Cutting from the middle and poking several drainage holes at the bottom of the bottle is a small planting cup. It could even pour a part of the cut bottle into the soil, with a small hole in the cap, into an easy automatic recharger。
Basis: no need to buy nutrient land. A few wet paper towels or make-up cotton on the bottom of the container are the best wet cushions, which are less perishable than gauze。
Light: no south balcony? An ordinary led lamp can solve the problem. They are fully able to meet their light-cooperative needs by taking 6 to 8 hours a day of sapling。
Harvesting: like pea seedlings, cutting with clean scissors and keeping a little base. After cutting, a drop of a drop or two of diluted rice water can be used in the next water supply to provide it with some nutrients, which will contribute to a better growth。
So, don't think it's complicated to grow food. Starting tonight with a bean, in a few days, you'll be able to harvest the first new hand-breeding in your own kitchen. That feeling is far more solid and sweet than what i bought from the market。