


Brief: digital camera storage cards sometimes lose photographs due to mishandling, but recovery can be significantly improved by understanding the rationale for deletion and using the correct recovery process. This paper will provide guidance on how to restore the deleted photographs on the digital camera memory card and address relevant knowledge points and attentions。
1. Photo deletion rationale and data recovery concept
In the digital age, photographs have become an important means of documenting life. However, understanding the rationale for removing photographs and the concept of data recovery is essential when photographs are accidentally removed or lost. This chapter will explore in depth the data rationale behind the deletion of the operation and lay the groundwork for data recovery。
1. 1 storage mechanisms for photo deletion
When we press the delete button on the camera or mobile phone, it appears that the photo has disappeared from the device, and in fact these data are likely to exist in certain locations of the storage medium. At the file system level, deletions are usually only marked as " usable " , without physical removal. Therefore, even if the documents cannot be accessed in the user interface, there is a risk that the data will be restored。
1. 2 rationale for data recovery
Data recovery is not magic, but rather an attempt to re-establish access links to data using knowledge of storage and documentation systems in computer science. The specialized data recovery software allows access to these uncovered data and re-enacts the documentation index by analysing the structure of the file system. However, once new data are written to cover raw data, the likelihood of recovery is significantly reduced。
1. 3 development of data recovery technologies
Data recovery technologies are also improving as technologies develop. From the initial simple recovery tool to the current smart recovery algorithm, data recovery has been re-engineered from simple files to more advanced operations that can restore lost partitions and repair damaged file systems. Advances in these technologies provide an opportunity to recover even photographs that have been removed for many years or that have been stored in damaged media. In the follow-up section, we will explore in depth the selection of appropriate data recovery tools and master practical processes。
Through the introduction to this chapter, we hope that the reader will have an initial understanding of data deletion and recovery. The next section will gradually reveal more in-depth technical details and operational skills that will help you to face data loss more readily。
2. Storage card use strategy and data protection 2. 1 understanding digital camera memory card characteristics 2. 1. 1 working principles of storage card
Digital camera storage cards, commonly referred to as flash cards, are based on non-facility storage techniques, which means that data will not be lost even in case of power disconnections. This storage medium consists of solid-state flash chips, which do not require magnetic heads and rotating discs, and is therefore more resilient and able to maintain data integrity in adverse environments. The storage cards enable accurate reading and writing of data through the control chip exchange with external equipment, the control chip coordination address coders, caches and data compression/decompression modules。
2. 1. 2 common storage card types and compatibility
There are various types of storage cards, each with different characteristics and speed levels. The following are common types of storage cards:
The physical dimensions of each card, the type of interface, transmission speed, storage capacity, etc. Vary. Compatibility depends on the model of the digital camera and the specifications of the manufacturer's design. For example, newer digital cameras may adopt faster and larger sdxc standards, while older cameras may only support slower sdxc standards. Before it is used, it is important to consult the user manual of the camera to confirm the type of storage card used and the maximum support capacity。
2. 2 recorded deleted storage card status 2. 2. 1 deleted data traces
When photographs are removed, the data on the storage card will not disappear immediately, but will be marked to cover at the file system level. This means that the operating systems no longer display these documents, but the actual data remain on the cards until they are covered by new data. This makes recovery possible, but also exposes the risk that the data may be accidentally or maliciously covered。
2. 2. 2 impact of writing on data
Writing operations are a key factor in data recovery. Once new data are written to the storage card, they are likely to cover those data areas that are marked as deleted. This not only reduces the success rate of data recovery, but may even result in the inability to restore any data. Therefore, any operation that may cause data to be written should be avoided before data recovery takes place。
2. 3 pre- and post-use attention to storage cards 2. 3. 1 correct handling of storage cards
The correct handling of storage cards is essential, and error may damage the data on the cards or the cards themselves. The following steps should be followed in handling storage cards:
Turns off the camera power to avoid operations during reading and writing. Ensure that cameras completely stop using storage cards. In accordance with the instruction manual for camera manufacturers, the storage cards are safely removed using the correct gestures. Handling in a clean and dustless environment on the surface of the storage card. 2. 3. 2 pre-use data backup and recovery plan
It would be wise to establish a data backup and recovery plan before using the storage card. The following recommendations are made:
This will ensure a rapid return to acceptable status even in cases of data loss and minimize the impact of data loss。
Next, we will continue to explore the selection of appropriate data recovery tools to assist in data recovery efforts。
3. Selection of appropriate data recovery tools
As technology continues to improve, multiple types of data recovery tools have emerged in the market. Whether data is lost as a result of mishandling, equipment failure or other causes, the choice of an appropriate recovery tool is key to solving the problem. This chapter will provide a detailed description of the types and selection strategies of different data recovery software, explore the rationale for data recovery and provide pre-operational preparatory work。
3. 1 type of data recovery software compared with choice 3. 1. 1 different types of recovery software
Data recovery software can be broadly divided into the following types:
Each type of recovery software has its advantages and disadvantages, and users should be selected according to specific needs and circumstances. For example, desktop applications are often preferred if lost documents are to be restored. Access to online services may be easier if data recovery is urgently needed during travel。
3. 1. 2 how to assess the effectiveness of the restoration software
In assessing the effectiveness of the restoration software, the following are key:
3. 2 understanding the rationale for data recovery 3. 2. 1 the rationale for data coverage and risks
The rationale for data recovery is based on the fact that data on storage media may not be fully covered immediately after deletion. When the file is deleted, the file system simply marks the space occupied by the file that can be covered by new data, while the actual data is kept on the storage medium。
It was important to understand that, because once the original data areas were covered by new data, the difficulty of recovery would increase significantly and even become impossible. Therefore, when data recovery takes place, the writing of stored media, such as off automatic saving, backup, etc., is minimized。
3. 2. 2 common error areas in software selection
In selecting the data recovery software, common errors include:
3. 3 pre-operational preparation 3. 3. 1 examination of software compatibility with operating systems
It is important to confirm that it is compatible with your operating system before running any restoration software. Most of the software will clearly indicate the version of the operating system supported on the official website. If necessary, it is possible to view the user manual of the software or contact technical support for more information。
3. 3. 2 availability of necessary hardware equipment
If data need to be restored from external storage devices (e. G. External hard drive, usb flash drive, etc.), ensure that appropriate card readers or data lines are available to connect the device to a computer. At the same time, in order to ensure a stable supply of electricity during recovery, it would be desirable to use usb ports with sufficient power or external power adapters。
The preparatory work should also include the identification of the health status of the storage equipment and the use of tools such as crystal diskinfo to check the s. M. A. R. T. Status of the hard drive for potential hardware failure risk. In addition, an empty storage space equal to or larger than the equipment to be restored is prepared for storage of recovered data to avoid space deficiencies in the recovery process。
4. Cleaning process for photo restoration 4. 1 discontinuation of storage cards for deleted photographs
Before proceeding with photo restoration, the primary task is to ensure that the storage card is not re-inscribed in the new data after it has been deleted. This is because new data may cover documents that have been deleted, making recovery difficult or even impossible。
4. 1. 1 importance of preventing data coverage
Once photographs have been deleted, their entry points (i. E. Indexes) on the file system will be marked as available, meaning that once new data need to be written, those “free” spaces may be used to store new data. Therefore, the use of storage cards should be avoided to the extent possible before a decision is taken to restore them。
Specific measures include:
4. 1. 2 how correctly to unload storage cards
In different operating systems, the correct unmounting of storage cards is slightly different. Take windows, for example:
Opens the computer management interface. Right-click the drive icon corresponding to the storage card. Select the popup option。
The operational steps are:
- insert card readers into the usb port
- find "safe delete hardware" on the system tray indicators
- select the corresponding device for "stop" operations
Please note that during these operations, ensure that there is no program in place to use the data in the storage card. This will help to reduce the risk of unexpected data coverage。
4. 2 connect storage cards to computers
When data are successfully blocked, the next step is to connect the storage card to the computer so that we can use the recovery software to try to restore the photo。
4. 2. 1 using card readers to connect to storage cards
To connect storage cards to computers, we usually need a card reader. The reader is a simple device that connects the storage card to the computer's usb port。
Specific connecting steps:
Inserts the memory card into the card reader. Connects a card reader to the usb port of the computer。
Once the connection is successful, the computer should be able to identify a new external storage device. In some operating systems you may be prompted to format the device. If this hint appears, select " cancel " or " close " to prevent the operation system from formatting storage cards。
4. 2. 2 computer identification memory card
When the memory card is connected to the computer, we need to make sure the computer correctly recognizes it. This can be done by looking at my computer or this computer。
- open this computer or my computer.
- check for new storage device icons
If the storage card is not identified, it may be a driver problem or a hardware failure. You can try to update or re-install the usb drive or replace a card reader。
4. 3 operation recovery software begins recovery
Finally, once you have identified the risk that the storage card will be correctly identified by the computer and that no data will be covered, you can begin photo recovery with the recovery software。
4. 3. 1 installation and operation of restoration software
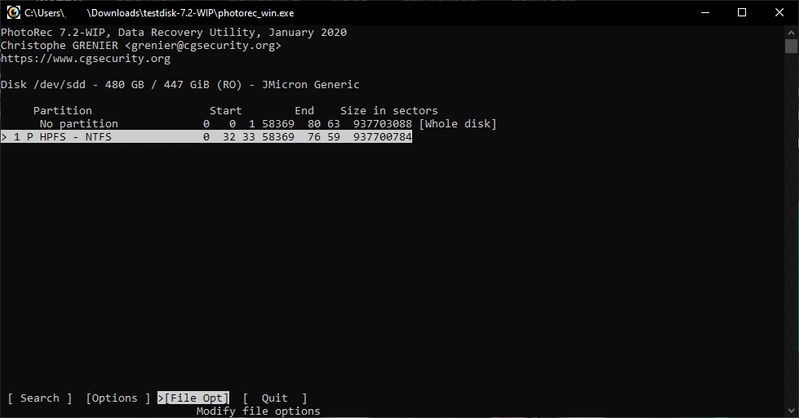
At this stage, you need to select a suitable recovery software and complete the installation with the installation wizard. Once installed, you need to start the software and follow its instructions for recovery operations。
The operating procedures typically include:
Start recovery software. Select the storage card device that you want to restore. Select the recovery mode (quick scan, deep scan). Waiting for the scan to be completed. Preview of recoverable documents and selective recovery。
Example of specific code:
# take a hypothetical command line restoration tool:
/dev/sdc1-mode
Of which --device parameters specify the path to the storage card device, --mode parameters specify the recovery mode。
4. 3. 2 select the correct scanning method
Usually, the recovery software provides at least two types of scanning: rapid and deep scanning。
In the event that the intended photographs are not found in the quick scan, it is recommended that a deep scan be used. Deep scans take more time, but the results are usually more comprehensive。
In this chapter, we have studied the physical process of photo recovery, which covers the detailed steps to stop using storage cards, to connect storage cards to computers, and finally to recover photographs by running back software. Through the above, we can effectively improve the success rate of photo recovery and provide security for the safe use of data。
Operations and attention after photo restoration
With the availability of data recovery tools, a growing number of users are able to recover lost photographs from storage cards themselves. Recovery, however, is only half the process, and the recovery photographs need to be properly processed and measures taken to prevent future data losses. This chapter will provide detailed information on the operational processes and matters requiring attention following the restoration of photographs。
5. 1 recovery of photo preview and selection 5. 1. 1 preview of recovered photo quality
The restored photo preview is the first step in determining whether the photograph is complete or not. Most data recovery software allows users to preview photographs before they actually recover. The preview allows users to see if the photographs are damaged and if they are required。
For photo previews, users usually have to follow the following steps:
Runs the data recovery software and selects the connected storage device. Quick scans or deep scans are performed, depending on the loss of data. After the scan is completed, the photo file is found in the results list. Double-click or click the preview button to view the photo contents。
The software may provide a preview of the thumbnails and actual images by which users can judge whether the photographs are complete and whether they need to be restored。
5. 1. 2 select photo file to save
The next step is to select specific photographic documents for restoration once the quality of the photographs is confirmed. Before recovery, careful screening is necessary to avoid the recovery of insignificant or unwanted photographs, waste of time and storage space。
In making the selection, the following steps can be followed:
Use data to restore the software's filtering function to screen photographs according to file size, type, date of change, etc. Check the list of selected photographs, which is not important. Select the photo that you want to save, usually by clicking on the tick box or holding down the ctrl(command) key. Performs a recovery order to save the selected photograph to a specified computer hard drive or other storage medium. 5. 2 completion of photo restoration and preservation 5. 2. 1 preservation of recovered photo to safe location
Once the photographs are restored, it is important that they be kept in a secure position. This means moving photographs from temporary storage equipment to long-term storage solutions, such as computer hard drives, external hard drives or cloud storage services, as soon as operations are resumed。
Steps taken to secure the photo include:
Identify target storage locations and ensure that it has sufficient space to store recovered photographs. Specifies a save path in the data recovery software. Click the restore or save button. Waiting for the software to copy photographs to avoid closing the software or computer during the process to prevent data damage. 5. 2. 2 inspection of photo integrity
Completeness checks are an indispensable step when photographs are kept. The integrity of the photographs was checked to ensure that no documents were damaged and that all recovered photographs were properly preserved。
The steps of the completeness check are as follows:
Access the target storage location to check whether the number of files and the file name are consistent with expectations. Opens each photo file to check to ensure that there is no problem with damage or cannot be opened. If possible, comparison of the original and recovered photographs confirms that no details were lost. If a picture is found to be damaged or incomplete, it may need to be restarted or a different recovery software tried. 5. 3 follow-up data backup and security operations 5. 3. 1 establishment of regular data backup plans
To avoid future data losses, users should consider establishing a regular data backup plan. This is essential for any scene involving the storage of important documents。
The steps in creating the data backup plan include:
Determine the type and frequency of data that require backup (e. G., daily, weekly or monthly backup). Select the appropriate backup storage medium, such as external hard drives, network attachment storage (nas) or cloud storage services. Select the backup mode, either full or differentiated or incremental. Arrange and automate back-up operations to ensure that the backup process is performed automatically in the absence of compliance. Periodically check the validity and completeness of backups. 5. 3. 2 avoiding the risk of future data loss
In addition to regular backup, measures should be taken to avoid the risk of future data loss. For example:
Use a writing protection switch to prevent accidental deletion or formatting of storage cards. Health checks are carried out prior to the use of storage cards to ensure that they are in good working condition. Avoid continuing filming when storage cards are full, so that automatic coverage does not occur. Ensure that storage cards are removed and properly preserved in a timely manner at low capacity of equipment。
By following these steps and recommendations, users can significantly reduce the risk of data loss while ensuring data security。
This chapter covers a range of operational processes and attentions after photo restoration and helps users to ensure that data are properly processed and preserved after recovery. In the next section, we will explore ways to avoid data inclusion and increase the rate of recovery success。
6. Avoiding data writing and enhancing recovery success
Avoiding data writing is one of the key steps in the data recovery process, since once the data removed are covered by new data, the likelihood of restoring them will be significantly reduced. This chapter will explore strategies to avoid data writing and how to improve data recovery success rates and cover post-recovery inspection and maintenance。
6. 1 hazards and precautions contained in the data
Once photographs have been deleted, new data writing operations will overwhelm the location of the original data, which may result in the recovery process not being able to retrieve the original data. Preventive measures are therefore essential。
6. 1. 1 avoiding the impact of automated backup functions
Modern operating systems and equipment usually have automatic back-up functions, which can be run backstage and automatically synchronize data to cloud or local storage. Ensure that these autobacks are disabled before the active data is restored。
Operation step finds automatic backup options in the device settings. Disables automatic backup or redirects it to an empty storage position. Confirm backup service stopped. 6. 1. 2 care for manual operations
In addition to automated backup, manual file operations (e. G. Copying, moving or saving new files) may also result in data overlay. Any operation that might include data should be avoided until photographs are restored。
Operational steps ensure that all software and applications are not automatically saved or synchronized after the photographs are deleted. Use of specialized card readers to connect storage cards to computers and to minimize the use of storage cards connected to cameras or other devices to reduce the risk of data writing. Disconnect all network connections from the computer to prevent automatic synchronization before restarting operations. 6. 2 methods to improve data recovery success
When appropriate preventive measures are taken, the use of the right methods and tools will significantly increase the success rate of data recovery。
6. 2. 1 select the right recovery model
Different data recovery software offers multiple recovery models, each with specific uses and advantages. The choice of the appropriate recovery model depends on the circumstances。
Analysis of the reasons for the loss of data in the storage card (e. G. Accidental deletion, formatting or damage). Based on the results of the analysis, the criteria recovery, the deep scan or the restoration of a particular file type were selected. If it is not clear which model is more appropriate, select the recovery model recommended by the software. 6. 2. 2 techniques for the use of advanced restoration functions
Advanced restoration functions usually provide deeper data scanning and restore data that cannot be recovered from standard models。
Operating step to open the data recovery software and enter advanced recovery mode. Select the appropriate scanning parameters based on the size of the storage card and the type of file system known. Scan and preview steps are completed in accordance with the guidance, supported by software. Position and restore the data you want. 6. 3 inspection and maintenance of data recovery
Following the successful recovery of the data, a series of inspections and maintenances need to be completed to ensure data integrity and to extend the useful life of storage media。
6. 3. 1 validation of completeness of recovery data
Post-recovery data need to be fully validated to ensure that the data are not damaged during recovery。
Operational steps use document validation tools (e. G. Md5 checkers) to verify recovered files. Compares the authentication of the restored file to that of the original file. If the verification codes are consistent, the integrity of the document is assured. 6. 3. 2 periodic inspection of the health status of storage cards
In order to maintain data security, periodic check-ups of the health status of storage cards are necessary。
Operational steps use software tools specifically designed for testing and maintenance of storage cards. Run integrity tests to ensure that storage media are not physically damaged. Refurbish storage cards using maintenance or formatting options provided by tools, if necessary。
In conducting the data recovery operation, the preventive measures and techniques described above can significantly improve the recovery success rate and ensure that complete and undamaged data are eventually available. The inspection and maintenance of storage cards should not be overlooked after the data recovery process has been completed to avoid the risk of future data loss。
Brief: digital camera storage cards sometimes lose photographs due to mishandling, but recovery can be significantly improved by understanding the rationale for deletion and using the correct recovery process. This paper will provide guidance on how to restore the deleted photographs on the digital camera memory card and address relevant knowledge points and attentions。